Instructions for when you have been through the Connection setup and have successfully connected to the remote computer (the server).

ACTIVE AREAS
There are 4 active areas of interaction on the screen which overlay the image from the remote computer.
The tap/touch control method depends on whether the Mouse Buttons are in ‘LIVE’ mode or not.
You can change the Mouse Buttons mode from the Options Menu which will appear when you use a quick three-finger tap in active area 3 (whatever the current Mouse Button mode).
In any Mouse Button mode a two-finger pinch/stretch in active area 3 will change the magnification of the server screen in the main viewing window
Mouse Buttons ‘OFF’ or ‘ICON’.
A quick single-tap anywhere in active area 3 will move the remote computers mouse to that location on the remote screen (without sending any button presses unless a button is held down (see below on icon mode) i.e. allowing mouse hovering).
Tapping and dragging starting away from the edges of active area 3 will move the server mouse around on the remote screen as you drag your finger around the display, while doing this if you drag to near the edges of the visible display then the viewing area of the remote screen will be auto-scrolled. ( the red line represents the edges of the screen.)
Tapping and dragging starting from near the edges of the display in area 3 allows you to move the viewing window around without any movement of the mouse location on the remote computer.
Tapping and holding without moving near the edges of area 3 will move the remote mouse on the remote computer`s screen and scroll the viewing window.
Tapping and holding (in a fixed location) away from the edges of area 3 has 3 functions.
Touch and HOLD for 0.75 of a second for the first function.
Touch and HOLD for 1.5 seconds for the second function
Touch and HOLD for 3 seconds for the third function.
As you touch and HOLD after 0.75 seconds the mouse button control icon ( 1 ) and the quick-move window ( 2 ) will toggle on/off. (Function 1).
If that ís all you want to do you could then release the touch.
Holding for a further 0.75 of a second will toggle keyboard control ( 4 ) on/off (Second function).
Again if that ís all you want to do then you can release the touch.
Holding for a further 1.5 seconds will bring up the Options Menu ( Third function ) and provide access to change some settings while connected and also for on-screen help and DISCONNECT.
Now you can also access the Options Menu more quickly by using a quick three-finger tap in area 3.
Mouse Buttons ‘ICON’ mode.
This is the same as Mouse Buttons “OFF” except the mouse icon appears ( 1 ) and you can touch the left mouse button, middle mouse button or right mouse button to send mouse-clicks to the remote computer & they are sent at the current location of the mouse pointer.
To double-click just tap twice, to triple click tap 3 times etc.
In addition the central area of the mouse icon can be swiped vertically up or down to send mouse-wheel movement.
Also if you need click-hold-and-drag mouse control then pressing and holding any of the three mouse buttons for half a second will hold down the button (button changes colour when active).
While active the mouse button concerned will stay held as you move the mouse cursor around. To release the held button just tap it again (it ís possible to hold more than one button at a time if necessary).
Mouse Buttons ‘LIVE’.
A quick single-tap anywhere in active area 3 will move the remote computers mouse to that location on the remote screen and send a left-mouse button click to the server.
A quick double-tap anywhere in active area 3 will move the remote computers mouse and send a left-mouse button double-click to the server.
A quick triple-tap anywhere in active area 3 will move the remote computers mouse and send a right-mouse button click to the server.
Touch/hold (without moving) in active area 3 will move the remote computers mouse to that location on the remote screen and hold down the left mouse button such that continued touching and moving allows you to ‘left-mouse drag’ on the server (with auto-scrolling when near the edges of the display).
Tap+Tap+Touch/hold in active area 3 will move the remote computers mouse and hold down the right mouse button such that continued touching and moving allows you to ‘right-mouse drag’ on the server (with auto-scrolling when near the edges of the display).
Touching and moving starting away from the edges of active area 3 will move the server mouse around on the remote screen as you drag your finger around the display (without activating the buttons), while doing this if you drag to near the edges of the visible display then the viewing area of the remote screen will be auto-scrolled. ( the dotted red line represents the edges of the screen.)
Touching and moving starting from near the edges of the display in area 3 allows you to move the viewing window around without any movement of the mouse location on the remote computer.
Mouse Buttons ‘Icon+’ or ‘Live+’.
Icon+ and Live+ modes are exactly the same as Icon and Live respectively with the addition that a small magnified area is shown around the current cursor position (fixed magnification at twice the pixel resolution of the original server screen).
In both Icon+ and Live+ modes this means that you can clearly see the cursor’s location on the server even when the main scale for the view of the server is too low to judge position accurately.
This allows you to much more accurately tap, tap+hold, tap+hold+drag etc.
Also in Live+ mode because the initial coordinate of such actions is taken from the position on the server screen corresponding to the position in the magnified area (assuming your initial tap/touch is within the magnified area) it is much easier to perform operations such as resizing windows without having to first increase magnification to improve the accuracy of your taps.
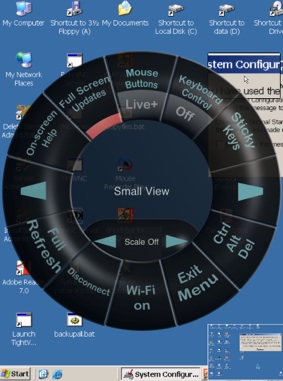
The Options Menu.
Note that on the options menu the icon (centre-bottom) shows whether the current connection is using WiFi or not, if using WiFi then the options menu will appear as above, if not then the “Wi-Fi on” message is not shown.
Also the “Ctrl Alt Del” icon is only shown/functional if the connection is set with “Host is PC” enabled.
View Mode (central text in Options Menu).
Tap the arrows to change the current view mode and tap the lock icon to toggle Screen lock:
Normal: Free resizing and positioning of screen.
Smallview: As normal but with small window showing entire server screen for rapid repositioning. See Smallview section.
Server size+Smallview: As Server Size but with Smallview enabled..
Full Screen (all): On selection sets magnification/position so that the server screen is entirely in view at the original aspect ratio.
Full Screen (max): On selection sets magnification/position such that the smaller server-screen dimension is maximised (maintains aspect).
Full Scale: On selection sets magnification so the server screen exactly fits the display (often requires change of aspect ratio).
Server Size: On selection sets magnification at 1:1 with respect to the original server screen pixel size (maintains aspect ratio).
Right arrow in Server Size mode takes you to Normal and left arrow from Normal takes you to Server Size.
Tapping the Lock icon on/off will toggle Screen locking on/off. When “on” the view of the server-screen is locked at the current size and location (apart from when you change view modes).
When the screen is locked the current options menu view mode text is displayed in red.
The Smallview.
Tapping or touching and moving in the quick-move window ( active area 2 ) will rapidly take the display window to any area of the remote computer screen without moving the mouse pointer.
You can resize the quick-move window by touch and hold without moving in in this area ( active area 2 ) for 0.5 of a second and the change area size icon will appear
then simply touch and drag the resize symbol to increase or decrease the size of the quick-move window.
The Keyboard.
In DesktopCONNECT you have four keyboard options: Off, On, Ext or Joypad.
“On” enables you to use the standard iPad keyboard to send key presses to the server.
“Ext” switches to using an extended keyboard which includes virtually full keyboard support for PC or Mac.
“Joypad” enables a joypad (bottom-left) which sends ‘w’ for forwards/up, “x” for backwards/down, “a” for left and “d” for right.
To use the joypad simply touch/hold/move to move as desired and release to stop.
When keyboard control is active ( area 4 ) then simply tap the icon to bring up the graphical keyboard and type as normal. To dismiss the graphical keyboard tap on the cross on the keyboard control icon when using the standard iPhone/iTouch keyboard or anywhere on the icon if in “Ext” mode.
Note that when ‘Sticky Keys’ is active the keyboard icon will either show “Tap to type (s)” or the text will be red. Sticky keys currently only applies when using the standard iPad keyboard.
The “Ext” keyboard has 3 layouts: “aBc”, “123” or “FN” and there are keys to tap to switch the layout.
Also “FN” layout has a choice of either being laid out for function key use or for keypad use (toggle using the kp/fn button icon).
In version 4.1.0 it is also possible to go change the current Ext layout by a left or right swipe over the graphical keyboard display.
If connected in “PC” mode then tapping the Numlock button icon will also toggle the layout when in keypad mode.
Points to note regarding the standard keyboard:
The Euro symbol will not work when connected to a Mac either when connected to the in-built Mac VNC server or when connected to the Vine VNC server.
The Yen symbol will not work when connected to the Vine VNC server on a Mac.
Points to note regarding the “Ext” keyboard:
It is especially important to make sure your connection settings are set correctly i.e. that you have correctly specified whether the server is a Mac or a PC.
When connected to the Vine VNC server on a Mac the “§’ symbol (section) does not work.
The equals key “=” on the FN layout in Mac mode should be the keypad equals but is actually sent as standard equals because keypad equals does not work with the Vine VNC server.
The operation of the “switch” type buttons in PC mode (Print Screen, Scroll lock, Pause) will vary depending on the VNC server used.
For example if using Ultra VNC then sending the VNC codes for these has no result.
Tap to toggle Tap to toggle Tap to enable/disable
“sticky keys” on/off help on/off full-screen updates.
(keyboard “on” only) When disabled only the
area in the main view will be
updated with changes from
the server.
Tap to Disconnect Tap to request full Tap to close the Tap to send ctrl.-alt-delete
server-screen refresh Options Menu (“Host is PC” only)
(also initially sends WOL
if WOL is set up on this
connection)